OBIEE 11.1.1.5: Sampleapp107 Deployment on windows
Prerequisites:
- Oracle Business Intelligence Enterprise Edition 11.1.1.5
- Database : Simple install Oracle 11g R2. OBIEE SampleApp deploys a set of small sized database schemas to support the examples
Copy SampleApp deployment folder in any local drive(D drive in my case).
1. Configure Install script:
Edit the “installSA.bat” installation script using a text editor to specify correct values for the following variable names. “installSA.bat” file will be used on Windows/DOS environments and “installSA.sh” file will be used on Linux/Unix environments. Double check the values for following variable values. Incorrect values can result in incorrect setup or environment corruption :
OBIEE_INSTALL_HOME – this should contain full directory path to OBIEE installation, for example,
- Under Windows : D:\OBIEE11G
OBIEE_INSTANCE – this should contain the active instance folder name. It is set to “instance1” by default.
Save and execute the batch file from command prompt
These two copy steps need to be manually executed with the appropriate paths on your setup.
1) Copy Comment.gif and NoComment.gif from your SampleApp install location /Actions/CommentaryArtifacts to the following two locations on your OBIEE install
/installhome/user_projects/domains/bifoundation_domain/servers/bi_server1/tmp/_WL_user/analytics_11.1.1/7dezjl/war/res/b_mozilla/actions
and /installhome/user_projects/domains/bifoundation_domain/servers/bi_server1/tmp/_WL_user/analytics_11.1.1/7dezjl/war/res/s_blafp/images
2) Copy UserScripts.js from your SampleApp install location /Actions/CommentaryArtifacts to the following two locations on your OBIEE install
/installhome/user_projects/domains/bifoundation_domain/servers/bi_server1/tmp/_WL_user/analytics_11.1.1/7dezjl/war/res/b_mozilla/actions
and
/installhome/ Oracle_BI1/bifoundation/web/app/res/b_mozilla/actions
2. Restoring Database Dumps:
In this section, we will use Oracle data pump to import the definition and data for several database schemas. If any of these schemas exist, they must be dropped before you begin the import.
List of Users:
BISAMPLE,
OBIEE_NAVTEQ,
BIFOD,BIBPM,
DEV_ODI_REPO,
ODI_STAGING
Connect to database using a sysdba user .
create a directory object to import the database dump.
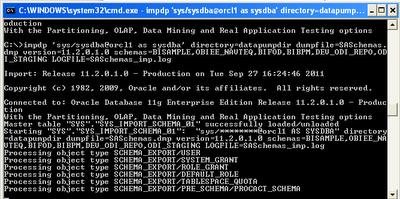
Import the dump file SASchemas.dmp using the following command.
impdp 'sys/sysdba@orcl1 as sysdba' directory=datapumpdir dumpfile=SASchemas.dmp version=11.2.0.1.0 schemas=BISAMPLE,OBIEE_NAVTEQ,BIFOD,BIBPM,DEV_ODI_REPO,ODI_STAGING LOGFILE=SASchemas_imp.log
If the command executes successfully it will run as follows…
NOTE:- Change the value of Version parameter depending on the version of your target database.
During the import process you may get the warning ORA-39082: Object type VIEW:"BISAMPLE"."ODM_SAMP_CUSTOMERS_LTV" created with compilation warnings.
This a known warning and can be ignored.
Once the import is completed, connect back to the database using a sysdba user and execute the following sql commands.
alter user BISAMPLE identified by BISAMPLE;
alter user OBIEE_NAVTEQ identified by obiee_navteq;
alter user BIFOD identified by BIFOD;
alter user BIBPM identified by BIBPM;
alter user DEV_ODI_REPO identified by DEV_ODI_REPO;
alter user ODI_STAGING identified by ODI_STAGING;
Next connect as obiee_navteq/obiee_navteq@sampledb1 and execute the following insert statements
insert into user_sdo_maps select * from obiee_navteq.my_maps;
insert into user_sdo_themes select * from obiee_navteq.my_themes;
insert into user_sdo_styles select * from obiee_navteq.my_styles;
insert into user_sdo_cached_maps select * from obiee_navteq.my_tile_cache;
commit;
3.Creating Web logic Server Users:
Start weblogic server.
Goto console…
Security Realms -> my realm -> Migration -> import
Browse to the following location in Sampleapp folder and click save.
D:\SampleApp_10722\Core\FMW_Users_Definition
You can see the users as follows..
Passwords for all SampleApp users imported, as well as the RPD encryption password is uniquely set to : Admin123
4.Deploying analyticsRes in WLS
Copy analyticsRes from SampleApp folder to the following path(take the back up of old one)
D:\OBIEE11G\instances\instance1\bifoundation\OracleBIPresentationServicesComponent\coreapplication_obips1
Go to Console…
http://client21:6001/console
Deployments-> click on install button
Go to deployments -> analyticsRes (which is deployed now)
Click on ACTIVATE CHANGES
5.Deploying Metadata Dictionary Folder in WLS:
Copy metadatadict from SampleApp folder to the following path(take the back up of old one).
D:\OBIEE11G\instances\instance1
Deployments-> click on install button
6.OBIEE Configuration Settings:
NQSConfig.ini Edits:
Open NQSConfig.ini file from the following location:
\InstallHome\instances\instance1\config\OracleBIServerComponent\coreapplication_obis1
USER_REF_GUIDS
Make sure the following tag (in green) is set as shown below in your NQConfig file and save it.
->[SERVER]
...
FMW_UPDATE_ROLE_AND_USER_REF_GUIDS = YES;
USAGE TRACKING
The following entry is not mandatory, but will allow the usage tracking SampleContent to show data, it is advised that you set these tags as described :
->[USAGE_TRACKING]
ENABLE = YES;
...
DIRECT_INSERT = YES;
PHYSICAL_TABLE_NAME = "10 - System DB (ORCL)"."Catalog"."dbo"."S_NQ_ACCT";
CONNECTION_POOL = "10 - System DB (ORCL)"."UT Connection Pool";
Instanceconfig.xml Edits:
InstallHome\instances\instance1\config\OracleBIPresentationServicesComponent\coreapplication_obips1
Comment the following tag.
<Catalog>
<UpgradeAndExit>false</UpgradeAndExit>
</Catalog>
Make sure you have all the following tags (in green below) in the file, within the existing <ServerInstance> tag. Some of these entries may already be present in your file. Ensure that entries are made only once and are in appropriate locations.
<ServerInstance>
<SpatialMaps><LayerDataLayout><MaxRecords>1000</MaxRecords></LayerDataLayout></SpatialMaps>
<LightWriteback>true</LightWriteback>
<ps:Catalog xmlns:ps="oracle.bi.presentation.services/config/v1.1">
<ps:UpgradeAndExit>false</ps:UpgradeAndExit>
<ps:UpdateAccountGUIDs>UpdateAndStartNormally</ps:UpdateAccountGUIDs>
</ps:Catalog>
<LogonParam>
<TemplateMessageName>LogonParamSQLTemplate</TemplateMessageName>
<MaxValues>100</MaxValues>
</LogonParam>
<SubjectAreaMetadata>
<DictionaryURLPrefix>/metadatadict/</DictionaryURLPrefix>
</SubjectAreaMetadata>
</ServerInstance>
RPD Edits:
Open RPD in offline mode (password Admin123).
Always open Admintool by opening the Start program menu, and navigating on to the menu icon within the Oracle Business Intelligence menu. Do NOT open the RPD simply double click on the RPD file or typing Admintool.exe in command line.
Edit BI_EE_HOME Variable Value:
Give the defauld initializer as follows..
'D:\OBIEE11G\instances\instance1\bifoundation\OracleBIServerComponent\coreapplication_obis1'
Update RPD variables that contain database connection information:
DB_HOST - This variable holds the value of the database host machine. localhost
DB_PORT - This variable holds the value of the port. 1521
DB_SID - This variable holds the SID information. orcl1
DB_USERNAME - This variable holds the database username. (Must be BISAMPLE)
WLS_HOST - This host information should be the computer name (or IP) of your Weblogic Server host. localhost
Run consistency check and ignore the following warning.
Save your offline RPD.
7.Setting the default rpd and webcat paths through EM:
Login to EM
http://client21:6001/em
Expand 'Business Intelligence' node -> coreapplication
Now click on the Deployment tab->Repository
Browse the RPD from SampleApp folder(which we updated earlier)
Copy the webcat from SampleApp folder to the following path
D:\OBIEE11G\instances\instance1\bifoundation\OracleBIPresentationServicesComponent\coreapplication_obips1\catalog
Now specify the webcat path as follows:
And then click apply, Observe the RPD is updated.
Now click on Activate changes.
Click on Restart to apply recent changes.
Now you can see the deployed sample app subject areas and dashboards..


